Pages

Showing posts with label Travel. Show all posts

Tuesday, October 21, 2014

Hang in There - 3 4x6 Photos


My husband never passes up a good opportunity for an afternoon nap.

We were touring the High Museum in Atlanta and needed a bit more time.  So we started back to the van to feed the fancy parking meter and he spotted the hammocks. They have probably 50 of these frame set up with a hammock you can leave in place or remove.  Some people were dancing or posing inside the structures.  Lenny used it for its intended purpose - a little siesta.


I tried a few designer papers with these photos, but nothing fit the contemporary feel I wanted.  So I stenciled with Crafter's Workshop 6x6 Mini Cubist stencil and some heavy gel and Perfect Pearls.  The sketch below is what I ended up doing but as you will see in the video, I had another plan at the beginning.

Sometimes things just need to evolve.  You can even sleep on it if you need to ;-)

The video at YouTube:


The sketch:


Thanks for visiting today.  More info on Scrapbooking with Stencils class can be found here:

Scrapbooking with Stencils

Thanks for all your comments on this month's newsletter video.  If you aren't a subscriber yet, be sure to sign up on the sidebar.  I will send a copy of the October newsletter to new subscribers in a few days.

Tuesday, April 29, 2014

3 Page Layout and NSD


Saturday is National Scrapbooking Day.  Yeah!  So many challenges and giveaways will be going on sponsored by most of the scrapbooking supply websites and message boards.  I hope you will get to participate.

I'll be creating a layout for LOAD - Layout a Day.  Think of LOAD as National Scrapbooking MONTH.  There is a challenge or prompt every day plus opportunities for prizes as the month goes along.  LOAD starts on Thursday, May 1.  You can still sign up and use code ASAP for $10 off:
Click here to view more details


My layout today is actually a 3 pager!  I have one traditional page and two pocketed pages to hold photos of all the pretty birds I saw at the Sylvan Heights Bird Park in eastern North Carolina.

One of my favorite parts of the park was the Landing Zone.  You purchase a $1 popsicle stick covered with birdseed and entered a large netted area.  The beautifully colored parakeets know exactly what that stick is for and soon cover your hand hopping over one another for the snack.

I wasn't all that organized and my purse kept falling down toward my left hand which held the stick.  I was trying to take photos with the right hand.  Finally I put everything down to get organized.  When I went to pick the stick back up, it was gone!  They had flown off with it.  It was a lot of fun and I did get a couple of good photos


For the layout I used Stampin' Up!'s Sale-a-Bration paper from this year called Sweet Sorbet.  The colors are perfect and I love all the small prints in this collection. They worked well cut into 4 inch squares for my pocket pages.


The collection had a matching stamp set so I used it to stamp out some flowers.  The journaling is typed on vellum.

I have a process video on this layout at YouTube and here:


So what are your plans for National Scrapbooking Day?  Thanks for watching!

Sunday, January 19, 2014

The Best Trail


We always love walking the trail around Bass Lake in Blowing Rock, NC.  It is a flat, crushed gravel trail with beautiful scenery.  These photos were from a day in August.  Oh, how I'd love to have a warm day like that right now!

For the page, I chose a sketch from my new sketchbook of the 2013 sketches.  The first part of the video shows how the sketchbook works.  The rest is putting together this page which went pretty quick.

Since the background paper was bold, I used some neutral cork, kraft and wood embellishments.


The title got a little help from a blue Faber Castell big brush marker to accent the edges of the light blue letters.  They were washing out against the blue and green print background.


Watch the video here or at YouTube:


More info on the sketchbook is found here.

Thanks for stopping by!

Tuesday, November 5, 2013

Roof Top Tour - 2 Page Layout and Video


Asheville's Biltmore used to call this the Roof Top tour.  Now it is the Architect's Tour.  I stuck with Roof Top as that is really why I took it to go out on the roof (or really the ledges).  Also, "Architect" was too long to fit in my space :-)

In the video you see that I started with a different color scheme and plan and changed it after finishing the modeling paste border.  I'm much happier with the final color scheme as the softer colors work better with the color of the house and the feel of the slightly cloudy, cool morning.  They seem to me a little dressier too.

As for the tour, I treated myself to this for my birthday this spring. My husband has been to Biltmore far more than he really wants and he isn't at all interested in hanging out on the ledges of any building.  I learned a lot about the architect, Richard Morris Hunt, and how the house was constructed.  I've been to Biltmore at least a couple dozen times but I still learn new things and see little touches here and there that I've missed.  It is an amazing design.  Whenever I watch Downton Abbey, it feels like I'm seeing the Biltmore come to life.

For the pages, I used one traditional 12x12 and one pocket page so I could fit in more 4x6 photos.  To created the border, I spread modeling paste over a Prima damask stencil.  It still amazes me that the heavier mediums like gels and paste work the best with stencils.  All of the journaling is on vellum to add to the soft feel.  The idea for the title work came from a layout in Sue Althouse's Perfect Your Process class going on now.


The stencil came in handy again to add just a touch of design and color to the lonely top of the left hand page.


Here's the video:


I didn't do a sketch for this one since I was working with the pocket pages and the left page was pretty simple.

Thanks for stopping by!

Tuesday, October 29, 2013

A Peaceful Walk - Page, Sketch and Video


Mid-September should be the height of migratory season.   The Canadian National Park website even listed the particular birds that we would see.  Well, they were either early birds or taking a detour because the only fowl we saw were two ducks who seemed very much at home in the marshland.

No matter.  It was a perfect walk in the breeze, so peaceful after zipping around freeways and trying to take in everything we could in museums for two days.


For the page, I was going for a peaceful, neutral look.   I'm not much of a neutral person so gold and navy ARE neutral to me.  The background paper from BasicGrey's Persimmon line was perfect.  It looked like the cattails we saw among the grasses and reeds.


For embellishment, I stamped an image and used some pastels on Studio Calico canvas leaves.  I also added a bingo card embellishment.  The photo mats are some cardstock repurposed from another project.

Here's the video at YouTube:


Sketch:


I enjoy doing these process videos.  I'm always looking for ways to make them more useful.  Suggestions are most welcome.

Thanks for watching!

Wednesday, October 16, 2013

2 Cameras are Better than 1


The first trip we took with 2 cameras was to Australia in 2006.  We had our regular film camera and a digital one.  Digital was fairly new to me then.  The reason for two cameras was insurance.  I wanted to be sure if we lost one or had problems with one, we had a backup.  I was so wary of getting home with no photos, I had some photos developed in Melbourne.  I put the developed photos in my checked bag and the images (I think it was the digi ones) in my two carry ons with the other camera.  Never were the two cameras in the same bag.  It was a once in a lifetime trip and I wasn't coming home without pictures to prove it!

Well, we got home with lots of photos.  Now we often take two cameras. On that trip, I did most of the photography.  Now my husband often takes photos, too.  I really like that because we two perspectives on our trip.  Plus, he carries one so I don't have to worry with it all the time.

We did not plan the photos above.  I turned around to take his photo and he was taking mine.  We are on the beach at Point Pelee National Park in Ontario.


For the page, I used some of the techniques from the Creative Cardstock class announced yesterday.

The only designer paper here is the background. The rest is cardstock.  The wood veneer is from Basic Grey's Carte Postale though is starts out the normal pale wood color.

I printed "Say Cheese" on my computer and had the "SMILE" from a stamp.


The ombre effect on the 2 and the effects on the other letters are part of a lesson in the class.  The class has 11 brand new layouts you won't find here or on my regular YouTube videos. Find more info on the class here:


With getting all the finishing touches on the class, I didn't get a video ready over the weekend.  Later in the week, I'll have another page, video and sketch.  Happy Wednesday!

Tuesday, October 1, 2013

Inside out and


sdrawkcaB.  That is how my husband put on his shirt after an afternoon nap when he was anxious to get down to the beach.  Unfortunately, he rushed for nothing; there was no beach to get to.  It was very high tide.  The rest of the week we had plenty of beach to walk on.

I love to create pages about funny moments.  For the layout, I continued the theme with arrows going in all directions.  My new product from Detroit hardly got to rest in its drawer.  The designer paper is from the Recorded paper pad by Webster's pages.  I also used the paperclips from this collection.  Everything is arranged on a kraft background.  The trim has been in my stash for ages.  At first I thought it would be too heavy but it worked out.


My husband was a little puzzled by the title until he figured out that the top word was 'backwards' spelled backwards.


The Cricut helped out on cutting all these arrows and their cardstock frames.

Here is the process video:


And here is the sketch.  I deviated a bit from my original plan.


After looking at the layout, Lenny told me I wouldn't have nearly as much to scrapbook if he were 'normal.'  That's true and how boring would that be?

Thanks for stopping by today!

Tuesday, September 24, 2013

Quick Travel Journal with a 6x6 Paper Pad (video)


Typically I make a travel journal for our trips; however, this time I left myself very little time to make one.  Without a journal, I tend to forget some of the details I want to include in our album.  I made this travel journal for our trip with papers from one 6x6 paper pad and little else.  The designs on the front are cut from some of the pattern papers.  The entire thing took less than 40 minutes including filming the video.

Using rings to hold the pages together make it easy to dissemble and use pages as journaling in my travel album later on.  Although, I have such poor handwriting that may not happen.  Still it is an option.
To save time, I did simple designs on each page.  Pages that had a busy print got a ledger stamped paper for writing space.


Now that we are home, all the pages are filled with details.  I've put the journal with my memorabilia from the trip so it will be ready when I get to the scrapbooking.

Here's the video at YouTube:

How do you capture your memories while traveling?

Thanks for stopping by!

Thursday, August 1, 2013

Scrapbook Page for My Travel Journal

Remember this travel journal from a few weeks ago?  I used it on my trip over the 4th of July so it has lots of notes from our activities.

I wanted to give it a home and what better one than my scrapbook.  So I did this page with a pocket from transparency film to hold the journal.


The photo of my friend Karen and me has many of our creations for the weekend in front of us.  Our clothing doesn't quite match the colors in the journal.  It is also a fairly busy photo along with the busy cover of the journal so I decided to give both their own space on the layout with different background papers.  The title and the mist help bring the two sides together.


Some of the embellishments are repeated also.  Several of the papers are October Afternoon's Travel Girl collection just as the travel journal.


I added a little extra space in the pocket to accommodate the bulk of the journal and its embellishments. All that is shown in the video below.

Watch at YouTube:


Here is the sketch:


Have you had your summer vacation?  We are thinking of one more trip together this year.  I'm learning to keep my plans open as issues seem to come up easier as we and my parents get a little older.  The last time I planned a flying vacation, I had to cancel at the last minute due to my own health so I think this fall's trip will be driving for sure.  Oh, and it will be a chance to make a whole new travel journal!

Thanks for stopping by today!

ETA:  One of my YouTube watchers just pointed out that I left out the 't' in Crafty!  Ooops!  Well, obviously I hadn't noticed so I'll have to figure out how to get that in my title after having glued down the letters.  Hmm.  That will be fun.  Anyway, I'm glad to know so I can get it fixed.

Tuesday, July 9, 2013

Shelter Cove Art Show


When we check in on Hilton Head Island, we stock up on all the local 'things to do' publications.  One advertised an art show going on that weekend (Memorial Day) at Shelter Cove Harbor only a mile from where we were staying.  We decided to bike up there the next morning and browse.

At first, I was a bit disappointed as there were only 5 or 6 booths by the harbor, then I turned around and saw a long line of tents back in the trees.  There are trees everywhere on Hilton Head so you really do have to look for stuff.  We were soon impressed by the range and intricacy of many of the crafts.  It had been awhile since we had been to this type of show and I'm either behind on what's trendy or these were some very high end artisans.  Metal works were common as well as etchings, unusual composition of paintings and even artwork made from humanely grown butterflies.  (I'm not sure what is humane about turning a butterfly into a piece of art, but they were pretty.  I think the butterflies have a normal lifespan and are not killed to make the art.)
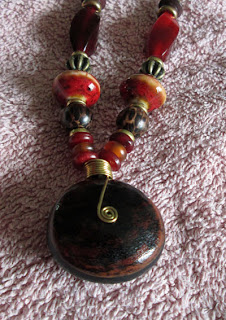
We browsed for a long time and I did buy a necklace made of sea beans.  A sea bean is a large brown object that looks like a piece of wood.  It comes from pods off trees in rain forests that wash down through the streams into the ocean.  After a few years drifting about in salt water, these turn up on a beach somewhere.  Mine was found in Liberia.  The husband of the couple selling them travels extensively for business in the shipping industry and found them.  Here's my necklace using a 'hamburger' style bean with a contrasting shade around the middle.


For the page, I created a photo collage in Photoshop Elements.  A few tips on creating a photo collage:

- Select the photos you want to use and have them all open.
- Create a new document in the size you will print.  I used an 8"x10" even though I didn't plan to completely fill the space.  Set the size to 300 dpi.
- Choose your main photo and crop to the desired finished size at 300 dpi.
- Drag the main photo onto your blank new document and position.
- Then choose another photo to line up beside of it or below or above and crop that photo using the measurements from the first photo as a guide.  For example, if my main photo is the one in the upper left corner and it is 4" wide,  I'll choose the photo below it and make it 4" wide and whatever height I want.
- Then drag that photo in place on your larger document.
- Continue selecting and cropping photo building out from one point.
- Save your project as a .jpg file.

This is just one way to go about a photo collage.

I had more journaling than expected so I tucked it behind the collage.  The video goes over creating a pocket from a regular mailing envelope:


I'm most pleased with how these flowers came out using designer paper from a 6x6 pad, ink refills and some glazing medium:


So here's the video at YouTube:


We are thinking of going to Belle Chere in Asheville, NC which is a giant art festival each July.  Has anyone ever been?

Thanks for stopping by today!

Friday, June 28, 2013

Travel Girl Travel Journal (video)


In the last couple of years, I've created some kind of travel journal for my trips.  It really helps me keep notes along with all the photos I take.  Last summer, I used October Afternoon's Campfire collection to do a journal for our mountain trip.  I did a video but never got around to posting it. So in the video below, there is a brief bit about that journal before going through the process of making this journal.

I was so excited to see a new collection by October Afternoon!  I love their 8x8 paper pads, label stickers and mini market stickers.  Also with this collection, I got the word stickers and the border stickers.

You can make travel journals or Smash style books out of any papers.  These just happen to be my choices.  I also really like to put ledger papers in so I'll have plenty of writing space.  Here are some close ups of the front cover followed by some of the pages:


Isn't the little car cute?  I won't be traveling with a dog but I'll be loaded down with lots of other things.


I like a few pockets for receipts and journaling cards:


Stamps make the book a bit more fun.

Here is the video at YouTube:

Thanks for watching!  Wherever you go this summer, I hope you travel safe and take lots of pictures!

Related Posts Plugin for WordPress, Blogger...