Karen and I experimented with my new tree stamp and some Perfect Pearls. Here is one of the resulting cards:
I have to say this one wasn't going so well at first. The original plan was to emboss the tree with my new Pewter embossing powder from Stampin' Up! Only, I'd left the powder at home. So we used a dark brown instead. Then we embossed the words in white expecting them to show through the Perfect Pearls. Well, they just didn't. So we had to stamp and die cut our phrase and add it separately. In between, we spent quite a bit of time blending colors.
I added a little clear Stickles to the tree branches.
The end result is a bit of a gloomy looking sky but we'll call it 'dramatic.' How's that for rescuing a card?
Anyway, it is a beautiful stamp and a stamp press is definitely on my wish list.
If you haven't entered my 1000 Subscriber YouTube Giveaway, click here to enter. Deadline is 6:00 p.m. Eastern today.
Tuesday, August 13, 2013
Saturday, August 10, 2013
School Notebook Covers
I thought it would be fun to use the same techniques I've used to cover spiral notebooks for myself for school notebooks. Typically I put the paper under the spiral portion of the notebook as shown below. For this one, I did a faster method of just taking the paper close to the spiral part. Both are shown in the video below.
The stickers are from Hobby Lobby. I had a young child in mind for this one. The designer paper is an older piece from Pebbles. A good medium weight paper is perfect for covering notebooks. The really thin papers show their wear quickly and the very thick textured papers are tough to fold around to the inside.
This notebook below is for Dillon if he wants it. Would a 7th grade boy like this? I'm not sure. He is growing up so fast and it is very hard for me to tell being quite a ways away. Anyway, it is an example of one that uses designer papers mainly. It uses the Yearbook collection from Studio Calico and some 6x6 Simple Stories 24/7 papers which coordinated nicely.
For this one, I did the paper under the spiral and used a sticker for placing the name. The letters are on there lightly so Jaime can remove them and pass it along to someone else if Dillon thinks it isn't 'cool' (or whatever the word is now.) Boy, am I the one getting old?!
Here is the video at YouTube:
Have you entered my 1000 Subscriber Celebration Giveaway. One randomly selected winner will get a special prize pack. The video and instructions are here. You have until Tuesday afternoon.
Thanks for stopping by!
Friday, August 9, 2013
Celebrating 1000 Subscribers!!!
Hi! I've been promising you a little surprise. There is a giveaway going on on my YouTube channel. We are celebrating...
To enter the giveaway, you must leave a comment on this YouTube video. The winner will be announced via another YouTube video next Wednesday. I will only contact the winner requesting address info to send the prize to. Comments on this post do not count as entries (though they are always welcome.)
(There has apparently been a YouTube scam going on where people get contacted say "You won! Please send your info..." when in fact you didn't so only give LisaEDesign your info if you see your YouTube name was picked. This goes for anyone's giveaway. It is a shame some people want to ruin things for everyone. Anyway...)
International entries are welcome. Thanks so much for all of your comments and support! If there are any particular videos you would like to see, please let me know. I love getting feedback.
1000 YouTube Subscribers!
To enter the giveaway, you must leave a comment on this YouTube video. The winner will be announced via another YouTube video next Wednesday. I will only contact the winner requesting address info to send the prize to. Comments on this post do not count as entries (though they are always welcome.)
(There has apparently been a YouTube scam going on where people get contacted say "You won! Please send your info..." when in fact you didn't so only give LisaEDesign your info if you see your YouTube name was picked. This goes for anyone's giveaway. It is a shame some people want to ruin things for everyone. Anyway...)
International entries are welcome. Thanks so much for all of your comments and support! If there are any particular videos you would like to see, please let me know. I love getting feedback.
Thursday, August 8, 2013
Cupcake, anyone?
Oh, to have something sweet! This was one of our card class cards for July. The stamp set is an old one from Hampton Arts though you could use any cupcake set. The border is from Interlocking Borders by Lawn Fawn (on-sale right now along with everything else in the store at Two Peas in a Bucket).
Stickles and liquid pearls form the 'sprinkles.' I used an enamel dot for the cherry on top. The whipped cream is white fabric paint which look almost real!
Thanks for stopping by! I have a surprise coming in a few days, hopefully by the weekend.
Wednesday, August 7, 2013
Reflection Stamping
I have always wanted to know how to create trees reflecting in the water so finally I chased down the instructions via a card I saw on Splitcoaststampers. It is this blog post from Ruth M.
This is actually a simple technique and so dramatic. For the background of the card, I masked off the bottom and then brayered and sponged on several colors for the sky. I reversed the process to do the ground and water. Then came the stamping of the trees from the old favorite, Lovely as a Tree stamp set from Stampin' Up! Check out Ruth's post and you will see her pretty card using the same stamp and the instructions for reversing the trees.
Thanks for stopping by today!
Tuesday, August 6, 2013
And this little piggy went to...
Truffles for their wonderful chicken pot pie in wine sauce. And he took along another little piggy who
had crab cake rather than her usual meatloaf.
Both were sated and happy after a relaxing meal in the contemporary
restaurant. It wasn’t crowded since it
was Memorial Day and the local business people who often dine there were
absent. And then one little piggy went
off to the beach and one had a leisurely afternoon nap. Can you guess which one?
This is my favorite travel layout so far this year. The papers from Echo Park's All About a Boy don't seem like they would fit a contemporary restaurant style but they do - at least the B sides do. The woodgrain background is also from this collection.
The layout also took me back in time to my early days of scrapbooking in the 1990's when I didn't know there was such a hobby and thus all these great materials to go out and buy. Back then, I used my photos, plain white cardstock from the office supply store, those sticky Hallmark albums, Microsoft Word, Power Point, and my trusty Epson dot matrix printer. I depended on my computer to create titles from WordArt and images from clip art.
No where in my vast current stash did I have any food embellishments that fit this layout so I again turned to Power Point and clip art to find some food and a pig image. I've added some additional color after printing and use Maya Road wood veneer frames.
More on how the page came together at YouTube:
Here is the sketch:
Sunday, August 4, 2013
House Art Canvas
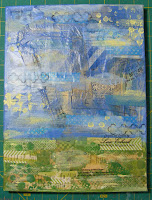
Remember this (right)? I did this background in May when I was taking Christi Tomlinson's Behind the Art class. Other projects took priority so I never finished it until this weekend. I rewatched Christi's video on adding a house and flowers to finish it up.The design sticks fairly close to her example. I positioned my house a bit high on the canvas so I added the walkway by painting in a backdrop and then using modeling paste and some Close to Cocoa ink over a circle stencil for the paving stones.
I wasn't sure about the flowers as they are out of proportion to the house, but they are one of my favorite parts. I also used Christ's rub ons that I'd bought from 2P's. For shading, I'm using oil pastels as they are very inexpensive. The drawback is that they can smear so you have to be very careful if adding another coat of Modge Podge over the top. If I dabbed it on with a sponge brush, it seemed to be fine. She uses Faber Castell markers in the video and I'm not quite ready for the investment.
I was pleased with the end result particularly as it is one of my first pieces. I made the background a bit busier than the example in an effort to try all kinds of things at once. Patience is not my strong suit. Although the idea is to have a lot of visual dimension with transparent paint, tissue paper, stamps and rub ons.
Also I learned some things that I really like the effect of (stamping in black) and things I don't (rub-ons in white at the end of a project).
I particularly like how you can use all kinds of things that might be gathering dust otherwise like old clothing pattern pieces, rub ons (I used some old Stampin' Up! ones as well), and acrylic paint.
For more info on Christi's class, check it out here. "Behind the Art" is very comprehensive.
I'll have a new video up for you tomorrowTuesday and a special surprise coming later in the week...
Thursday, August 1, 2013
Scrapbook Page for My Travel Journal
Remember this travel journal from a few weeks ago? I used it on my trip over the 4th of July so it has lots of notes from our activities.
I wanted to give it a home and what better one than my scrapbook. So I did this page with a pocket from transparency film to hold the journal.
The photo of my friend Karen and me has many of our creations for the weekend in front of us. Our clothing doesn't quite match the colors in the journal. It is also a fairly busy photo along with the busy cover of the journal so I decided to give both their own space on the layout with different background papers. The title and the mist help bring the two sides together.
Some of the embellishments are repeated also. Several of the papers are October Afternoon's Travel Girl collection just as the travel journal.
I added a little extra space in the pocket to accommodate the bulk of the journal and its embellishments. All that is shown in the video below.
Watch at YouTube:
Here is the sketch:
Have you had your summer vacation? We are thinking of one more trip together this year. I'm learning to keep my plans open as issues seem to come up easier as we and my parents get a little older. The last time I planned a flying vacation, I had to cancel at the last minute due to my own health so I think this fall's trip will be driving for sure. Oh, and it will be a chance to make a whole new travel journal!
Thanks for stopping by today!
ETA: One of my YouTube watchers just pointed out that I left out the 't' in Crafty! Ooops! Well, obviously I hadn't noticed so I'll have to figure out how to get that in my title after having glued down the letters. Hmm. That will be fun. Anyway, I'm glad to know so I can get it fixed.
Subscribe to:
Posts (Atom)


